
Just prior to Cuthbert’s 80,000 km service the rear axle pinion seal started to leak again. This is the second time this has happened and it appears to be a weak part on the axle design. I therefore had the Iveco garage in Puerto Montt, Chile replace the seal during the service. The old seal had failed and appeared to have let some sand through into the axle. A few days later whilst I was under the vehicle checking the rear differential switch, I noticed that the drive flange had some play in it which is not normal and concerned me.
We drove back to the Iveco garage but on arrival the axle was hot and there was no play. We had to wait almost 4 hours for it to cool enough for the play to reappear. The Iveco mechanic tried retorqueing the pinion nut, but this did not completely fix the issue. We concluded that the front bearing on the pinion shaft had worn and needed replacing. A quick check of the warranty to see if it would cover the repair revealed that it ended 18 days ago L
To get an idea of prices, I checked on the internet for UK prices for the Iveco parts: £157 + VAT for the bearing plus £495 + VAT for a shim kit. We then looked up the prices on an independent specialist supplier’s website (the same quality TKM bearing, not a cheap copy): the bearing was just £30 and the shims about £12. So we won’t be asking Iveco to do this work!
I read through the Iveco workshop manual to see what was required to change the bearing and whether it would require any specialist tools. I also got some great advice from Don, a fellow Daily 4×4 owner, see his website www.goingbush.com. Don used to overhaul and modify axles etc and has a lot of truck experience. He shared with me a very important stage of the differential removal process: the casing needs to be spread by about 0.35 mm to allow the bearing to be released. Not doing this will require forcing the release of the bearing and most probably damaging the bearing and the shims in the process. There are holes in the axle for attaching the spreader, but there is no mention of any of this process in the Iveco workshop manual nor any specialist tools listed! Another reason not to leave this job for Iveco.
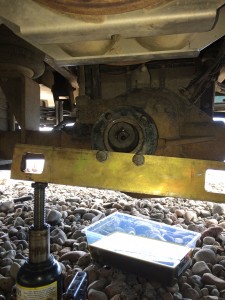
Before we committed to the replacement of the bearing, we decided to open up the differential and take a look to see if: (a) there was any other damage that needed attention; and (b) whether I could feasibly make an axle spreader to do the job as Don advised. Luckily, there was no additional damage and hopefully just changing the front bearing should fix the issue. To make the axle case spreader I used the bars from the ground anchor kit of my winch (used to recover the truck when there is nothing else to attach the winch cable too), some angle iron and a jack. It worked very nicely and I could very precisely adjust the spread down to an accuracy of about 0.01 mm using a dial gauge that I found in a local shop in Puerto Montt.

Another problem was finding a way to hold the drive flange while I undid and retorqued the pinion nut. My first attempt using some 5 mm thick angle iron was not a success and the bar simply bent and broke under the pressure.
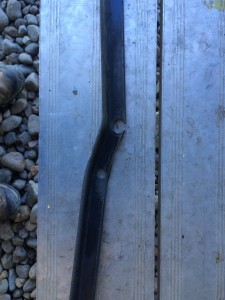
The second attempt using a couple of holes drilled into one of the ground anchor bars (again, from the winch) was successful.
The final tool I needed was for measuring the resistance (torque) when turning the pinion shaft. This measurement is used to decide the number and size of shims that are required to correctly pre-load the pinion shaft bearings. None of the tool shops in Puerto Montt stocked such a tool, so again I need to make one.
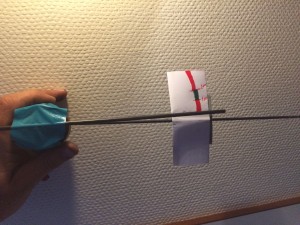
When I use the tool, I will need to measure a torque of between 1 and 2 Nm whilst turning the pinion shaft at 50 rpm when it is at 25°C. The day temperature here in summer in southern Chile is about 25°C and turning the shaft at just under one revolution per second should give approximately 50 rpm, so it shouldn’t be too hard to do. To measure the torque, on the socket that I use to turn the shaft, I have attached a springy bar that will flex slightly when used to turn the pinion shaft. I have fixed another bar to the socket that will not be touched during the turning process. The difference in the relative position of the two bars will be proportional to the torque applied when turning the shaft. A simple piece of paper attached to one shaft can then be calibrated to show this relative position and hence measure the torque being applied.
So to the maths: 1 Nm of torque is a force of 1 Newton being applied at a distance of 1 metre. A 1 kg mass has a force due to gravity of 9.81 Newtons, so if I hang a 1 kg mass on the end of a bar which is a metre long, I will be applying a force (torque) of 9.81 Nm to the end of the bar. However, my bar is only 300 mm long, so to get a force of 1 Nm I need to hang a mass of 0.34 kg on the bar and to get a force of 2 Nm I need to hang a mass of 0.68 kg on the bar. I have found that 2 bananas and 4 bananas respectively produce these masses and I was able to calibrate my scale. See… school physics lessons do have a use 😉
In the local shops of Puerto Montt, I was able to find a bearing supplier and they had the bearing we needed in stock. We also need a selection of shims to correctly space and pre-load the bearing when it is installed, but unfortunately all they could provide were 4 shims all 1 mm thick and not the range of sizes I need. Apparently this is all they can get, which is a real problem for us!
In the meantime, I continued to check regularly the play in the pinion shaft and it remains very small. For now… we have decided to delay replacing the bearing until either: (i) we find the correct shim sizes in another town; or (ii) the wear becomes so bad that we really need to replace the bearing to avoid anything else getting worn or damaged. At present all movement in the pinion shaft disappears once the axle has warmed up and is only an issue while it is cold.
Update 3 weeks later:
When we travelled north from Puerto Montt we found a bearing shop in Temuco which stocked the required sizes of shims, so I now have the parts to change the bearing properly. Once I had the shims, I did another oil change and inspection of the rear differential to see how it had fared over the last couple of weeks. I am happy to report that the oil is clean and there were no nasty surprises on the mag-plug. Also, since I last tightened the pinion nut using my modified ground anchor bar, there has been no play in the flange. I have therefore concluded that this whole incident is due to the pinion flange nut not having been tightened correctly by the Iveco mechanic due to him not having the correct tool for the job! At least now, I have all the parts so that I can do a full repair myself ‘on the road’ if it becomes necessary.
Update 5 weeks later:
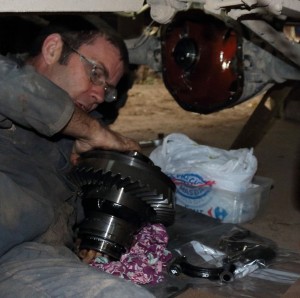
Unfortunately, the play in the pinion is back, so I have decided to change the bearing to prevent damage to other components. We found a nice campsite where I could spend a couple of days working on the truck. The strip-down was straight-forward and I made sure I marked everything clearly so each part could be reassembled in its original places.
 Removing the half-shafts so that the differential could be removed, reminded me of the James Bond Aston Martin with the extending hub caps to take out the baddies 🙂
 Removing the differential was quite easy, but it was very heavy! No need to go to the gym after this workout!
 Now the pinion shaft could be hammered, with a nylon mallet, out of the front bearing and axle.
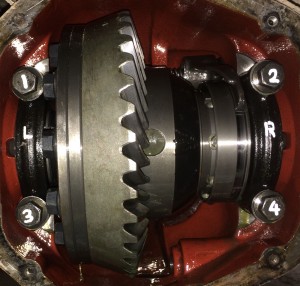
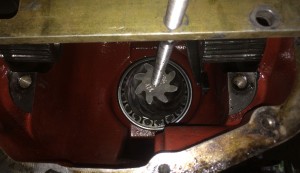
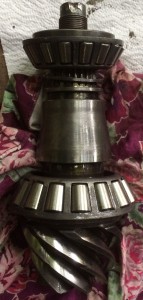 This photo shows the pinion shaft, rear bearing, large spacer and two shims, and the worn out front bearing at the top of the photo. With the pinion shaft removed I was able to have a much closer look at the bearing. I could see that the outer race of the bearing had a lot of wear, and the taper rollers clicked into it when held together. Clearly the finished surface on this outer bearing had failed and was wearing rapidly. The last time I had the seal replaced in Chile, I watched the mechanic insert the new seal (using the correct Iveco tool that I had lent him for the task). Once the new seal was in place, he wanted to push it in further, but I stopped him from doing this. He wasn’t too happy, but he left it how I asked.
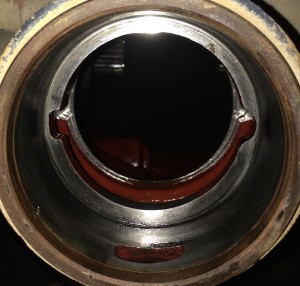
The question in my mind now, is why a robust piece of engineering such as the bearing has failed after such a short time? At the time that the seal was replaced in Chile, I didn’t actually see the old seal before the mechanic removed it, so I can only make an educated guess as to what may have been wrong with it. Now having looked inside the axle, it looks to me like the previous seal (which I had changed under warranty by Iveco in Austria) had been pushed in too far. In the differential design, there is nothing to stop the seal being pushed all the way back to the bearing; this is why Iveco makes a special tool for installing the seal, leaving it set in just the right place.
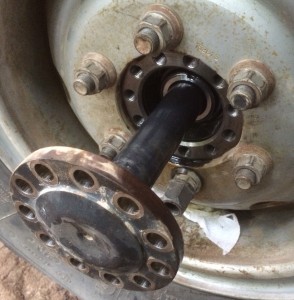
As you can see in the photo below, the area just in front of the bearing is clean. In front of that, where the seal should have been, there are some dirt and marks that I would not expect to see if the seal had been in that position all the time. My conclusion is that the previous time the seal had been replaced, the mechanic may not have used the correct tool and had pushed the seal in all the way. When the seal is pushed in too far, it covers the oil-feed hole that you can see at the bottom of the photo. I believe that this reduction in oil flow could be the reason for my bearing lasting only 85,000 km!
 If I am right, it is obviously very annoying and it doesn’t give me much confidence in Iveco carrying out work on my Daily 4×4. The 4×4 model is not a common vehicle and the mechanics don’t seem to know much about them. Anyway, on with the repair…
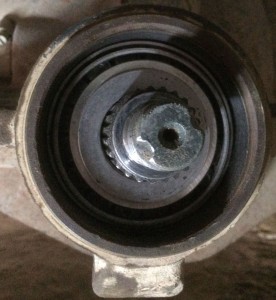
The outer bearing race is quite easy to drift out from behind.
 Then the new one installed.
 Next I reassembled the pinion shaft using the original shims, but without the seal installed. I had to hammer on the front bearing, which pushes the pinion shaft out of the back of the axle. To stop the pinion shaft moving I used a length of M12 threaded rod inserted through my modified ground anchor bar, that was strapped to the back of the axle. This held the pinion nicely in place while I hammered on the bearing.
 Once the bearing was part-way on, the pinion nut caught a thread and could then be torqued-up to the full torque of 430 Nm, which would seat the bearing fully. I then checked and saw that the torque required to rotate the pinion shaft should be between 1 and 2 Nm (see banana calibrated tool above and is why you don’t install the seal yet). The torque that I had was too low, so I had to mallet the pinion shaft out, remove one of the original shims and substitute it with a thinner one. I did this four times before I realised that the pinion nut was actually thread bound and so not applying the full force to the bearings! I stripped the pinion down again, reinstalled the original shims and then also added 2mm of shims in front to the bearing, so the pinion nut would not be thread bound.
 Success! The revolving torque was nicely in the green of my gauge, 1.2 Nm!

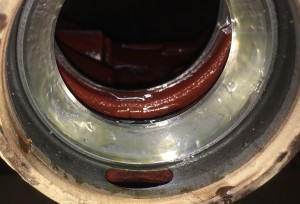
The drive flange was then removed and a new seal installed (using the correct Iveco tool!) to set it at the correct spacing in the axle.
 Then the flange was reinstalled and the pinion nut re-torqued. The pinion was finished – now to reinstall the differential.
The differential would not go back in as easily as it had come out. I did not want to strain or damage any of the components as they are critical to the correct operation of the differential. I therefore used the axle spreader that I had made (see above). This spread the casing nicely by 0.3 mm and I was able to slide the differential and its shims easily back into place. Then it was just a question of bolting the bearing caps back in, checking the pinion to crown wheel clearance, and reinstalling the half shafts.
All in all, not too bad a job! Let’s hope this new bearing lasts a little longer.