
For the last four years we’ve been using a Victron 220 Ah AGM leisure battery for all our electrical needs in Cuthbert the Camper-truck. It’s done us good over the years, but its performance is now starting to decline. The easy option would be to simply replace it with a new one of the same type. But there’s lots of newer battery technology out there now, so we looked at a lithium leisure battery and it sounded pretty nifty. Here’s how we made the change. (click here to skip to the financial cost comparison between AGM and Lithium).
What’s the problem?
The design specification for the Victron 220 Ah AGM leisure battery is for a loss of around 20% of its capacity over 1,500 cycles. Looking at the life we have had out of this battery, we’d say that it has roughly met this specification. The problem for us as overlanders living in a camper-truck with the battery’s deteriorating performance, is that we need increasing levels of sun on the solar-panels to constantly recharge the battery. On hot, sunny days, we can’t park-up in shady areas for long. In the tropical rainy season when it is almost permanently cloudy and overcast, we have difficulty getting enough recharge in a whole day. The higher temperatures mean that the fridge is drawing more power and draining the battery quickly.
Lithium leisure battery – the way ahead?
 Lithium Iron Phosphate (LiFePO4) is the safest in the family of lithium leisure battery technology. It offers several advantages over lead acid batteries:
- It’s 30% lighter than a comparable capacity lead acid battery
- It’s 30% smaller than a comparable capacity lead acid battery
- It doesn’t need to be fully recharged regularly (once every 3 months is enough)
- It’s more efficient, during a full ‘discharge-to-recharge’ cycle (a lead acid is about 80% efficient but a LiFePO4 is 92%)
- When charging a lead acid battery above 80%, its efficacy drops to below 50% whereas the LiFePO4 remains 90% efficient
- A lead acid battery’s life decreases rapidly if it is discharged below a 70% charge. The LiFePO4 can be discharged comfortably to 50% and even if discharged to 20% has a much longer life that a lead acid
- The LiFePO4 batteries are made up of four 3.2V cells giving a battery voltage of 12.8V, this is 0.8V higher than a lead acid battery (six 2V cells). Electric compressor fridges are very sensitive to small voltage drops in their supply, this additional 0.8V will increase the fridge’s performance.
Lithium leisure battery – the ‘down-side’
All those advantages sound rather nice, but nothing is perfect. So what are the disadvantages?
- A very high initial purchase cost, but the ‘through-life’ costs are cheaper than lead acid (click here for our cost comparison analysis)
- The lithium leisure battery requires protection from over-charging
- It also requires protection from over-discharging
- And it requires cell balancing within the battery.
Performance Comparison: AGM v Lithium Leisure Battery
The battery compartment for our leisure battery was tailor-made for the original AGM battery. To fit a lithium leisure battery into this space, we’ve had to use three 90 Ah LiFePO4 batteries to provide the capacity that we would like. In the table, the AGM battery performance is compared to the three LiFePO4 batteries that we used to replace it (based on the Victron specifications):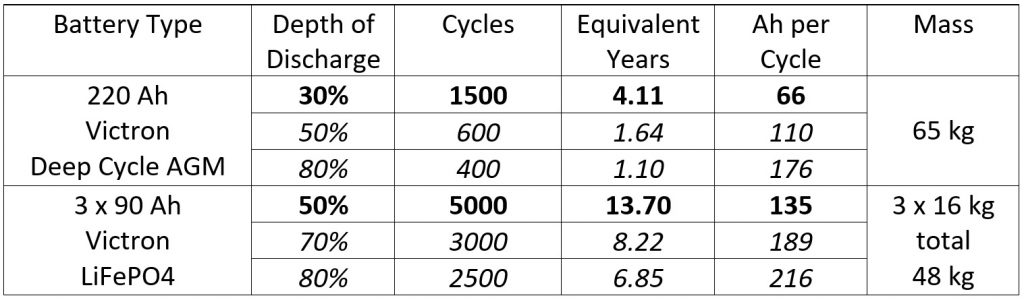 This shows that the three LiFePO4 batteries will provide a significate increase in available power over a much longer life. So, if with the lithium leisure battery we limit ourselves to 50% discharge, we will get more than twice the power, for over three times the life, than we were getting with the AGM when limited to 30% discharge. We also get the bonus of saving 17 kg of weight in the truck!
And the even better news is that the Victron figures for the LiFePO4 lithium leisure battery appear to be quite conservative. The cell manufacturer rates the life-cycles at 8,000 for 50% discharge, which if correct, would give us a battery life of 21.9 years. That’s over five times the life of the AGM!
-
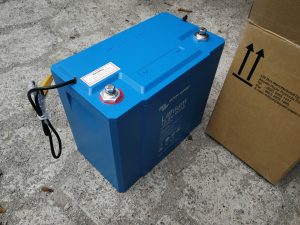
- The old AGM Battery
-
- The new lithium batteries
For us as overlanders in a camper-truck, the main advantage will be the ability to park-up for several days in the shade, or when there is not much sun, and not have to worry about charging our batteries. When the batteries do need charging, they will be much more efficient at charging from the vehicle alternator and solar chargers.
The System, Interfaces and Installation
The Lithium Leisure Battery
Each Victron LiFePO4 lithium leisure battery is made up of four cells. Within each battery is a system which:
- balances the charge between each of the 4 cells; and
- monitors each of the cells’ voltage and temperature.
Each battery is capable of continuously supplying 90 amps or 900 amps for 10 seconds! Each of the three LiFePO4 batteries is protected with a 100 Amp fuse and the three batteries are wired in-parallel. The negative and positive power cables running from the paralleled battery bank terminals to the vehicle, are both the same length and connected at opposite ends of the paralleled battery bank. This means that all the batteries receive the same voltage-drop in the wires, and they are all as balanced as possible with regards to load and charging.
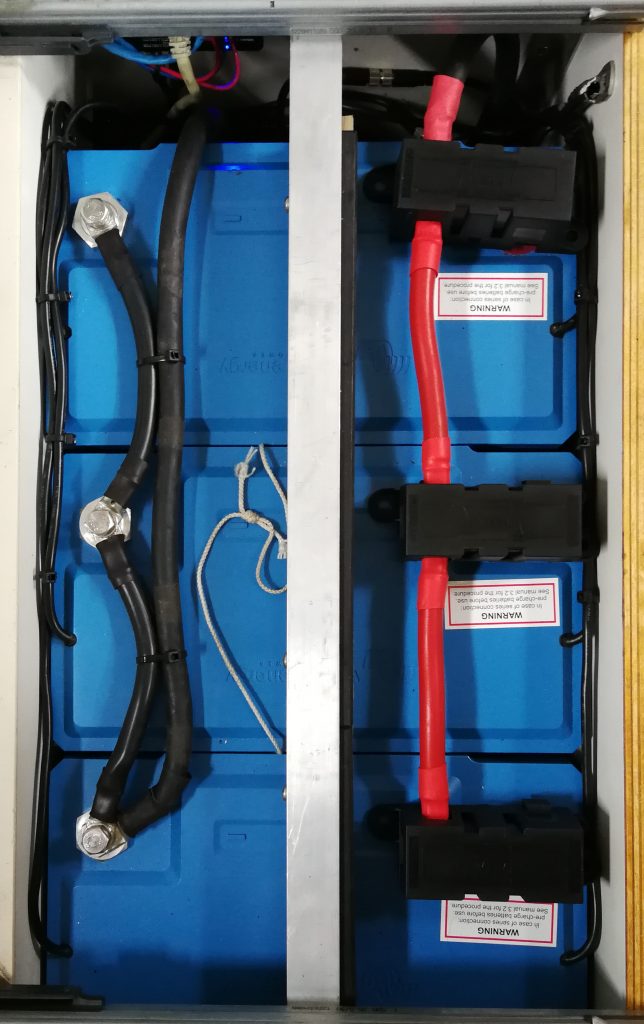
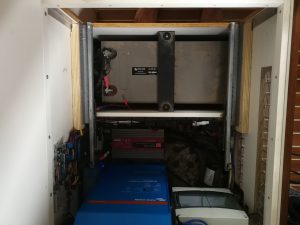
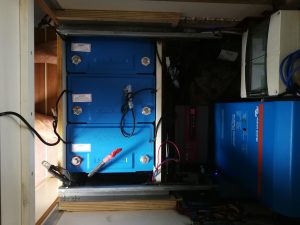
Finished Installation
The Battery Monitoring System (BMS)
Connected to the LiFePO4 batteries is a Battery Management System (BMS). If any of the batteries detect a cell that is outside of voltage or temperature limits, a signal is sent to the BMS. In the event of the voltage or temperature of any cell being too high, the BMS will turn off any sources of charging (or in the case of the Victron Inverter/charger it will modify the charging to allow that cell to be balanced or cool down). If the voltage of any cell is too low, the BMS will disconnect the load. This ensures that the batteries are always protected.
BMS interface to the Inverter/charger
The BMS is designed to talk to our Victron Inverter/Charger directly through the VE.Bus data network. To set up the system, it was simply a question of installing the BMS in the network between the inverter controller and the Inverter/Charger. The BMS is also supplied with a mains voltage detector. The mains voltage detector is installed in the VE.Bus between the BMS and inverter/charger. If the inverter/charger has been shut down due to low battery voltage, the mains voltage detector will turn on the inverter/charger in charging mode only as soon as mains power is available. This obviously gets the batteries recharged as quickly as possible.
BMS interface to the MPPT solar charger
The BMS should connect to our Victron MPPT solar charger through the VE.Direct interface cable socket. However, as we already have a MPPT controller display unit connected to the MPPT solar charger VE.Direct port, I had to cut open the VE.Direct cables and make the connections to allow both the MPPT control display and BMS communicate with the MPPT solar charger port. Basically, the Tx from the MPPT could be split to both the MPPT controller display and the BMS interface, but the output of the MPPT controller display had to be connected with a 10K ohm resistor to the BMS interface output and the MPPT Rx input. This is because the BMS interface shorts the MPPT Rx input to ground to turn off the charger. If the MPPT controller display is outputting data at that time, it could damage its output with the line shorted to ground!
BMS interface to the split charge relay
We had been using a National Luna split-charge system to connect the truck’s engine battery and alternator to the leisure battery and were very happy with it. However, with a LiFePO4 battery there are slightly more optimum voltages for the relay to engage and disengage. It also needed to be interfaced with the BMS so that the connection could be controlled by the BMS if required. We therefore replaced the National Luna split charge relay with a 230 amp Victron Cyric-Li-ct split charge relay. The Cyrix-Li-ct is optimised for LiFePO4 voltages and interfaces directly with the BMS. If an over-voltage is detected on a cell in the LiFePO4 batteries, the BMS will turn off the Cyrix-Li-ct to isolate the batteries from the engine alternator to prevent over charging.
BMS interface to other systems
To complicate the installation, we have a second solar charger and a second mains-powered battery charger. Both of these also need to be controlled by the BMS (turned off in the event of overvoltage or excessive temperature in a battery cell).
Our second solar charger does not have any remote on/off capability. I therefore installed a relay in the solar panel feed, linking to the second solar charger. This means that when the BMS interface energises the relay, it will disconnect the solar panels and turn off any charging from that charger. I also installed into the second mains-charger’s remote control circuit, a relay which is controlled by the BMS interface. This means that the BMS can control the output of the second mains charger.
Finally, I have a second split-charge relay to connect the truck’s engine battery and alternator to the leisure battery. I use this while winching or if I ever need to ‘jump start’ the truck from the leisure battery. I added a small circuit to isolate the second split-charge relay so that the BMS could turn that off too if required.
Why have two mains-powered chargers and two solar-chargers?
The Victron inverter charger works from 187 VAC to 265 VAC, which is not used in much of The Americas. I therefore installed a second charger that has an input range of 90 VAC to 265 VAC. (click here to see this). A while ago we did an upgrade to our solar charging system which resulted in the two chargers (click here to see this).
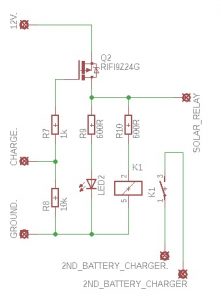
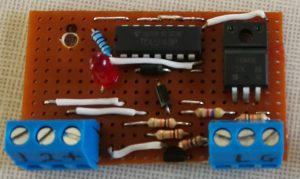
BMS Interface circuit
When the BMS wants to turn off the charging or load, its output changes from 12 volts to floating. The output power of the BMS ports is very limited and given the floating output, the interface requires an electronic solution.
I built two interface circuits: one to isolate the second mains-charger and the second solar-charger, and one to control the second split-charge relay.
Below is the circuit diagram and photo of the interface between the BMS, the second mains-charger and the second solar-charger. The signal from the BMS is applied to the FET. When the BMS output changes from 12V to floating, the output of the FET is turned on. When the FET is on, the following happens:
- LED illuminates
- the second mains-charger remote control relay is energised, turning off the charger output
- the relay in the second solar-charger panel-feed is energised, cutting the solar power to the charger, effectively turning it off.
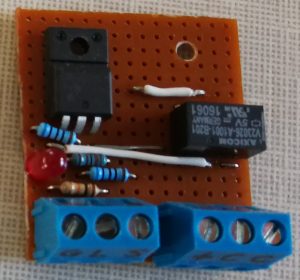
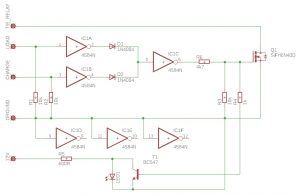
Below is the circuit diagram and photo of the interface between the BMS and the second split-charge relay. This interface monitors both the load and charge signal from the BMS. If either of the signals become floating, the LED illuminates, the FET is turned off and so the second split charge relay is also turned off. Note that the FET controls the ground wire of the second split charge relay. The manual switches I have to control this relay, supply the positive feed to it.
Other changes
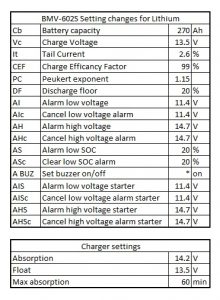 Whilst doing this upgrade, I also updated the firmware in the Victron Inverter/charger and MPPT solar charger. This is to optimise them for LiFePO4 batteries and for use with the BMS. I also changed the settings in our two Victron BMV-602S battery monitors for use with the LiFePO4 batteries. I may fine-tune the ‘Vc’ and ‘It’ values as I get more experience with the system. This will optimise the ‘fully charged’ indication.
Note: we were able to do all this work in San Jose, Costa Rica with supplies from SERC Systemas de Energia (contact Roberto Kruse speaks English)
The Cost Battle: AGM -v- Lithium
Comparing the cost of lithium and AGM batteries for campervan use is a tricky business. It can of course be done, but as with all these things, there’s a bit of ‘geekiness’ involved. It all depends on how hard you make the battery work; what % of battery power you drain in a typical day of usage (i.e. a ‘cycle’).
One way to do a cost comparison is by a straight calculation of price for each Amp hour (Ah) that is used from each type of battery.
Basis and Assumptions for Calculations
Here is the basis and the assumptions on which the calculations are based:
1. We compared the following:
- our old 220 Ah Victron AGM battery – price £566
- our new bank of 3 x 90 Ah (total 270 Ah) Victron lithium batteries – price £3,230
This is obviously an increase in overall capacity, but remember we are calculating the price per Amp hour, so the overall increase in capacity doesn’t make much difference.
2. Victron data sheets for the AGM battery for each day of use (i.e. ‘cycle’) show:
- Discharge by around 30% of the battery capacity is the optimum usage.
- At 30% discharge, it gives 66Ah per cycle and gives a battery life of around 1,500 cycles.
- If the battery discharge increases to 50% per cycle, it will give 110 Ah of power in each cycle, but the battery life reduces to around 600 cycles.
- If the battery is discharged by 80% it will give 176 Ah, but only for a life of around 400 cycles.
3. Victron data sheets for the lithium batteries show:
- Discharge by around 50% of the battery capacity is the optimum usage.
- At 50% discharge it gives 135 Ah per cycle for around 5,000 cycles.
- If the battery discharged increases to 70%, it will give 189 Ah per cycle for around 3,000 cycles.
- Even if you hammer the battery and discharge it by 80%, it will give 260 Ah for around 2,500 cycles over its life.
Price per Amp hour of the 220 Ah AGM Battery
With ‘optimum’ use, assuming the battery is never (or very rarely) discharged by more than 30%, the calculation is:
1,500 cycles x 66Ah = 99,000 Ah over the life of the battery. Battery cost = £566.
Over the life of the battery, the cost per Ah is £566/99,000 = £0.0057 per Ah.
HOWEVER… as truck-based overlanders, we found this low volume of ‘optimum’ discharge to be unrealistic with our AGM battery. Particularly as it got older (from around 1,000 cycles onwards) the performance really started to drop-off. It often discharged by far more than 30% on a cycle. Only in absolute optimum, cool but sunny conditions on cloudless days was it possible to stay within the 30% discharge limit. In tropical hot/overcast conditions, the discharge was frequently over 40%. A 50% discharge gives 110 Ah per cycle, but this limits the number of cycles in the battery life to only 600 cycles. The realistic calculation for using a 220 Ah AGM battery for truck-based overlanding in tropical climates is therefore:
600 cycles x 110 Ah = 66,000 Ah over the life of the battery. Battery cost = £566
Over the life of the battery, the cost per Ah is £566/66,000 = £0.0086 per Ah
So if the AGM battery is used fairly heavily as we (and many others) need for overlanding in a truck in the tropics, the price per Ah is around 50% more than with the ‘optimum’ battery use.
Price per Amp hour of the 3 x 90 Ah (270 Ah) Lithium Batteries
Using the same Ah as in the realistic AGM calculation above, if we used 110 Ah per cycle with lithium we would get around 5,000 cycles. The price per Ah calculation would be:
5,000 cycles at 110 Ah = 550,000 Ah over the life of the battery. Battery cost = £3,230.
Over the life of the battery the cost per Ah is £3,230/550,000 = £0.0059 per Ah
HOWEVER, as Victron has specified, this level of usage is less than the ‘optimum’ for these batteries and is therefore not the most efficient/cost effective use. The optimum discharge of 50% per cycle, gives 135Ah each cycle for around 5,000 cycles. So the calculation here is:
5,000 cycles x 135 Ah = 675,000 Ah over the life of the battery. Battery cost = £3,230
Over the life of the battery, the cost per Ah is £3,230/675,000 = £0.0048 per Ah
Conclusions on Price per Amp Hour Calculations
The conclusion on whether lithium is better value for you, comes down to your battery usage. Only you can know this for your own electrical needs. For us, the usage is much dictated by the conditions we are travelling in.
- For optimum battery discharge/use, the AGM at 0.57 pence per Ah is around 18% more expensive than the lithium at 0.48 pence per Ah. But if your usage allows you to stay within the ‘optimum’ usage for an AGM 220 Ah battery, you might want to consider getting a smaller lithium set-up – see ‘One more thought…’ below.
- For heavy-duty battery discharge/use, (e.g. overlanding in conditions where battery discharge regularly exceeds the optimum) the AGM at 0.86p per Ah is almost 80% more expensive than lithium at 0.48 pence per Ah over the whole life of the battery.
For us, the decision based on the numbers above was a ‘no-brainer’ – lithium is the way ahead. All this, and we saved a weight of 17kg in our truck too!
And another thing…
The manufacturer of the cells in the Victron lithium batteries, Winston, estimates that Victron’s figures (as we used above) are on the conservative side. Winston specifies that the lithium battery has a life of over 7,000 cycles at 50% discharge (i.e. 135 Ah per cycle). Using these figures, the calculation would be: 7,000 cycles x 135 Ah = 945,000 Ah over the life of the battery. Battery cost = £3,230. So the cost per Ah is £3,230/945,000 = just 0.34 pence per Ah. If correct, this would make the AGM battery (on our heavy-duty usage) some 250% more expensive than the lithium per Ah.
One more thought on the cost of AGM v Lithium…
Let’s just say you’re not like us and you don’t need heavy-duty use on the AGM battery. What if you can manage with 66 Ah per cycle that the optimum use of a 220Ah AGM battery gives you? You could get a 90 Ah lithium battery for £1,076. Discharging this by 73% each cycle would give you around 2,800 cycles over the battery life.
The calculation would then be: 2,800 cycles x 66 Ah = 184,800 Ah over the life of the battery. Battery cost = £1,076. So the cost per Ah is £1,076/184,800 = 0.58 pence per Ah. This is just 1% more expensive per Ah than the AGM 220 Ah battery. HOWEVER… the lithium battery is giving you 2,800 cycles of use (assuming you use it daily, around 7.5 years of use). The AGM gives you only 1,500 cycles of use (i.e. around 4 years, assuming daily use). There is also a 49kg weight saving and a big space saving between the 220 Ah AGM and the 90 Ah lithium battery.
(Note: prices are based on a Google search of battery dealers in UK as at April 2018)
Update Jan 2020
Optimising battery life
I have been doing some more research on optimising the battery life of our Lithium Iron Phosphate batteries. Until recently we have normally achieved 100% charge on most days. Doing this is good practice for a lead acid battery, but my recent research shows that for a lithium battery it could in fact be shortening its life! I’ve now learned that the charging voltage reached at ‘100% charge’ is quite stressful for a lithium battery. Limiting the charge to 90% results in a lower charging voltage which can double the battery’s life! It is recommended that the batteries are charged to 100% once a month. The 100% charge is so that the cell balancer can work its magic and keep all the cells in balance.
So, I wondered, how can I set up the system so that the battery doesn’t charge to 100% every day? I have already installed a few Arduino computers in the truck which monitor various systems and share the information on a CAN bus between each of the computers and my AFAM display unit. I therefore decided to connect the BMS ‘charge’ control wire (see installation information above) through a relay controlled by one of the Arduinos so that the Arduino can turn off all battery charging by turning on that relay. I then added some code to the existing software to take the following actions:
- If the state of charge is above 88% – turn off the chargers
- If the state of charge is below 85% – turn on the chargers
- If it is more than 25 days since the batteries charged to 100% – charge to 100%
- If the battery voltage is below 12V – turn on the chargers
- If the AFAM display control request a charge to 100% – turn on the charges
Note: chargers = Split charge relay, mains powered battery charger and both solar chargers
The Arduino reads the data from the battery monitor (Victron BMV602S) and uses that data, together with the above parameters, to control the charging of the batteries. The batteries’ charge is therefore kept below 88%, except for a full charge to 100% every 25 days. The extra check of the voltage is just in case the battery monitors’ assessment of the state of charge is in error and the battery needs charging (the accuracy of the battery monitor will reduce the longer the time from the last 100% charge). I also have an override switch on my AFAM display so I can force a 100% charge if I think I will need maximum charge for some reason e.g. planning to park up for an extended period in poor weather (low levels of solar).